
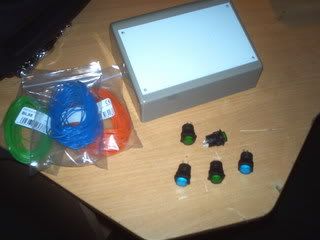
I haven't been on this site long but i already have the inspiration to do my own project so today i went to maplin my local electronics store and went and bought this project box, cables and illuminated push on and off buttons...
I am going to buy a usb game controller me thinks and re-wire it up to the buttons i have bought! I am going to buy more buttons but they only had these left in the store so im ordering the rest online!
Not really sure exactly how im going to make the buttons light up when they're supposed to but hey its all a bit of a learning curve for me so who knows! The buttons have 4 points on them. @ marked + & - which is standard so somehow i gotto figure what to do with the rest. I anyone has any ideas then let me know haha...
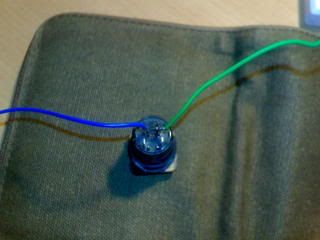
back of the button: excuse my poor soldering lol!
Was gonna do something similar to this : http://djtechtools.com/forum/showthread.php?t=2492 only with illuminated buttons instead of buttons and leds! I know its basic but this is my first try!
I'm only ever gonna use this as a show off piece for ableton so its not gonna be spot on. I just wanted to get to know hows it done first and then maybe move onto something abit more elaborate hehe! What do you guys think? Any tips?

Results 1 to 10 of 13
Thread: My First mod!
-
02-23-2009, 05:02 PM #1Tech Convert


- Join Date
- Jan 2009
- Location
- Staines - England
- Posts
- 11
 My First mod!
-
02-23-2009, 05:24 PM #2Tech Mentor

- Join Date
- Apr 2008
- Location
- Eindhoven,The Netherlands
- Posts
- 225
Nice, keep posting pics!
and don't lose your patience.
All the info on how to do it is out there, it just has to come to you.
I'll try to help if I can.Macbookpro 2.4 i5 4gb
Traktor Pro 1.2.6.
Black VCI-100 Mod firmware 1.3
Presonus Firebox
-
02-23-2009, 05:27 PM #3
 Dr. Bento

- Join Date
- Mar 2008
- Location
- Perth, Australia
- Posts
- 6,383
You gotta crawl before you can walk - nice work dude

Keep up the good work and keep us up to date !
-
02-24-2009, 07:33 AM #4Tech Convert
- Join Date
- Jan 2009
- Location
- Staines - England
- Posts
- 11
Right i'm having trouble figuring out the wiring!
This is one of the buttons i am using:
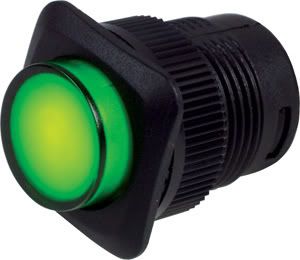
these are the specs:
Rating 1.5A 250Vac
LED 2.2Vdc 25mA
Bezel size 18 x 18mm
Button diameter 12.8mm
Panel cut-out 15mm diameter
Length behind bezel 18mm (excluding solder terminals)
Solder terminals Silver plated Brass
The reverse of the button there is 4 connections (as shown in my frist post) I have already wired up + and - to green and blue wires respectively!
It states on the website that this button can be wired either way so that the light can be illuminated when the button is on or off...
so im guessing that i will have to connect one of the "extra" connections (by extra i mean one of the other 2 connections that are not + or - that i have already soldered to wire) in line with either the + or - so that the light will be connected upon pressing!
Would my assumption be correct or will i not be able to do this?
And for an update today i bought myself a cheap usb game controller! Not sure if its going to do the job or not as its only a cheapy from japan and it doesn't appear on the controlmate compatibility website (coz i have a mac and that was the program i was going to use to reprogram it) but we'll see in due time i guess!
-
02-24-2009, 03:12 PM #5
Dr. Bento
- Join Date
- Mar 2008
- Location
- Perth, Australia
- Posts
- 6,383
2 of the conecters are for the button on and off
and the other two connectors would be for the LED control.
Just think of it as an led control and button serpate from one another.
-
02-24-2009, 03:25 PM #6Tech Mentor
- Join Date
- Apr 2008
- Location
- Eindhoven,The Netherlands
- Posts
- 225
How it works;
If you push the button you make contact to your device.
the device (that is programmed) recognizes the signal and sends a signal to your led to go on or off.
It is not the hardware part of the button itself that make the led go on/off.Macbookpro 2.4 i5 4gb
Traktor Pro 1.2.6.
Black VCI-100 Mod firmware 1.3
Presonus Firebox
-
02-24-2009, 04:22 PM #7Tech Guru

- Join Date
- Mar 2008
- Location
- Redmond, WA
- Posts
- 1,169
Soldering tip:
If you have to connect lots of stripped wire ends to stuff and you don't have the necessary three hands, flux is your friend.
- Take the stripped wire end and dip it into a pot of solder flux to very lightly coat the exposed metal part of the wire.
- Position the coated wire end against the contact you want to solder it to.
- With your coil of solder laying on the table in a "hands free" manner (free end sticking up), tap the tip of your iron against the solder so that a small blob melts and is transferred to the tip of your iron. The rosin core of the melted solder will quickly burn off as smoke. This is exactly as designed.
- Holding the coated wire against the contact, solder as usual and hold the wire still until the solder sets. You will find that as the tip of the wire heats up, the flux coating melts and the solder almost jumps off the iron onto the wire and fills gaps easily - the reason for this is that the flux breaks the surface tension of the melted solder and the soldering iron tip (now that the original flux core has burned off) is slightly repellent.
- Job done. Repeat for the next N-hundred joints...

So, go get yourself rosin some flux. Solder with a flux core is great if you can position the iron on the component and tap the flux against the newly heated contact - the flux embedded in the solder does the job of breaking the surface tension. If you find that you don't have enough hands to work like this then coating the receiving part with a tiny bit of flux does the same job but doesn't require you to melt the solder at the joint itself.
Oh, and don't bother with ROHS lead free "silver" solder for hobbiest projects. It melts too hot and is a royal PITA to use. Normal Tin/Lead solder will make soldering a lot easier, melts cooler (protecting your components) and generally causes a lot less burned boards, melted plastic and swearing at things.
Hope that helps someone.Last edited by Fatlimey; 02-24-2009 at 07:02 PM. Reason: Clarity, darling!
-
02-24-2009, 05:56 PM #8Mr. Golden

- Join Date
- Mar 2008
- Location
- San Francisco
- Posts
- 970
Great Tip Fatlimey!
We need to buy some of that here in the techtools workshop! What do you think about writing a basic soldering tutorial for beginners? That could be a big help for people.
-
02-24-2009, 07:00 PM #9Tech Guru
- Join Date
- Mar 2008
- Location
- Redmond, WA
- Posts
- 1,169
Sure, why not.
I'll see what I can cobble together.
-
02-25-2009, 08:11 AM #10Tech Convert
- Join Date
- Jan 2009
- Location
- Staines - England
- Posts
- 11
Programmed through the software i take it right? coz i figure the usb game controlled im using that doesn't have lights on it won't be able to do this so it would be the software i use to program that would turn the LED on and off! Originally Posted by Anthony More

and if that is the case where/what on the controller has the functionality to be wired back up to the LED switch to tell it to go on and off?
or am i just being stupid? I haven't got my controller yet so i only pose the question because i havent yet seen it! Im guessing that i will be able to program one of the free buttons that i dont use to sent an on or off message to the light? But surely i won't have enough buttons? Hmmm This is going to require some investigating!
Has anyone ever used illuminating push switches before? If so any tips?Macbook Pro 2.16ghz, 2GB Ram, 100GB 7200Rpm HDD + 500GB 7200Rpm Ext HDD, KDJ500, Firewire 410, 2x KRK RP8 G2's & an Akai MPK49!

 Reply With Quote
 Posting Permissions
|
|
© 2023 DJTechTools
Bookmarks