DIY Mod: Cuban MIDI Crisis

hand_made

Tired of the plastic mainstream controller offerings, I decided to take things into my own hands and explore the world of DIY controller construction. As most of our readers will know, the Midifighter DIY kit features optional analogue inputs that are ripe for modification and an easy place for the newbie controller maker to start. I decided to dedicate my mod to the  birthplace of salsa, Cuba, by enclosing the results in a cigar box and toping off the theme with some tasty wooden knobs. This article will demonstrate how to do assemble your own personalized controller that is sure to catch eyes and requires just a few basic tools. VIVA LA MODIFICATION!

Step 1: Choose your weapons

actionshot

The Midifighter comes with expansion slots for 4 analog and 4 digital controls. Possible analog examples include potentiometers, faders and even a modern game-console joystick. Knobs that have a physical start and end point are called potentiometers or  ”pots,” while endless knobs are called encoders. Digital controls examples include switches, rotary encoders or touch strips. For this mod, I choose to add four panel mounting pots for expression. The panel mounting style of pots mean that you can secure them to the top sheet, which is easier for entry-level modders.

The best part about making your own mod is that you can choose exactly what kind of components fit your personal style. At the end of this article we list various online locations where you can purchase components, and the more adventurous may choose to take components from old appliances and boards.

Step 2: The MIDI Silo

BigRunCigarBox

Now that you know what you want in your mod, it’s time to consider how to house it. A good enclosure will secure your new parts, minimize broken connections and maximize its visual appeal. There are many choices in enclosures, but here are a few important factors to take into consideration:

  • Will the Midifighter board and components all fit? The PCB is about 5.75″ (14.5cm) square
  • Will the material be safe or interfere with the components? Metal, wood and plastic are all good choices, but one should be aware of the operating temperature of the circuit (5 volts) and any chance of flammability.
  • Will it attract the adoration of the opposite sex? (Optional and unlikely.)

Step 3: Plotting Trajectory

breadboard_to_PCB

Before you start soldering, it’s a good idea to test out your components and get familiar with the wiring concepts. I recommend you use a breadboard (shown above) to do a mock-up before assembling the controls in the final box.

  • Cut about 20, 4″ pieces of your wire and strip both ends of the wires by 1/4″.
  • On the underside of the PCB (Midifighter Board), you will see a printed list of inputs on the right side: GRD, D4-D1, A4-A1 and 5v.
  • Pull out your breadboard and you will see a negative (-) and positive (+) column on at least one side of the breadboard.
  • Connect a wire from the GRD port of the PCB to the 1st row of the negative column on the breadboard.
  • Now, connect a wire from 5v on the PCB to the positive column of the breadboard.

Step 4: Arming the warhead

pot_guide 
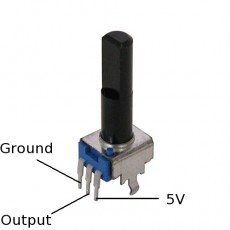
The image left shows the connection points of the pots. Some pots are different, so check the specs to confirm.

  1. Insert the pots into the breadboard as shown in the photo above.
  2. Bridge the negative column on the breadboard to the “ground” peg of your pot.
  3. Bridge the positive column to the “5v” peg of the same pot.
  4. Insert a wire from the output peg  row to one of the analog inputs
  5. Repeat 1-4 for all pots

Existing Midifighter owners will have to upgrade their firmware to the latest version (see the forum post) to use the analog controls. With the new firmware installed,  hold down the top-left button (nearest the USB connector) while plugging in the USB cable to drop the MF into “Menu Mode”. You can then enable MIDI events from the analog inputs using option 7. Remember to exit through the top-level menu to save the settings permanently. Check out the readme to get a more detailed explanation on menu mode and turning analog control on.

If all is well, your new controls should be MIDI mappable. The analog controls appear as MIDI cc 16-19 and can be assigned through your program of choice using MIDI learn; just hit Learn and twist the pot. If they are not yet MIDI mappable, check the polarity and current on the breadboard and pots using a multimeter (see below). If everything is working properly, you are ready to begin installing the components.

Step 5: Dig the Missile Sites

holes

  • Download the top plate template of the Midifighter.
  • Print this document out on paper  and use it as a guide to cut the holes for your arcade buttons.
  • Carefully mark the center point of each hole with a sharp object, and then use a 1″ spade bit to drill out the arcade holes and a smaller bit for the light pipes.
  • For potentiometers, I used a 3/8″ bit to cut holes for the pots to push through.

DRILLIN

Step 6: Installing the Payload

Time to roll up the sleeves and turn up the heat with a soldering iron.  If that sounds daunting, don’t worry- there are many good online soldering tutorials.

  • Mount all of the pots to the box and snap the arcade buttons into the PCB
  • Run one single GRD and one + 5V wire to your first pot. Now bridge two wires from that pot to the next pot’s GRND and +5. In this way all of the pots can share both power and ground plus your wiring stays nice and organized.
  • Solder each pots output wires to one of the analog inputs to the PCB.

midi-fighterexample
Insiders Tip: If you see yourself modding your Midifighter more than once, think about getting a set of male and female “headers” , and solder the female ones to your Midifighter PCB expansion port. This will give you the ability to plug and unplug wires instead of soldering directly to the PCB.

The Blueprint

top_view

A Midifighter DIY Kit
4 10k pc mount potentiometers — “pots” come in many flavors of resistance or Ohms (from 5k to Mega Ohms), to get a feel for the difference look here
A breadboard –breadboards are typically used for prototyping, but since they do not require soldering and distribute power they can be a good choice for a beginner mod.
At least 4 feet of 24′-28′ gauge wire – gauge determines how much current a wire can carry
A 15-30 watt soldering iron/gun – the modder’s prime weapon. You may find it useful to buy or (make with a coathanger, AYOR!)
Rosin core solder – soldering used to be a two part process: heating solder with flux and then applying. Rosin core has flux built-in.
An electric drill, 1″ and 1/3″ drill bits
A cigar box — found on eBay or local tobacconist
4 wooden drawer handles – undrilled is best for this project
Wire strippers (optional, recommended)
Jumper wire (optional)
Multimeter (optional) – digital multimeters are cheap and useful for checking continuity in your wiring and parts. Make sure they measure voltage, resistance and current and are Class 1, component class.

This is by no means a definitive list, but should get you started in the right direction. In particular, using a breadboard is optional. Ordering parts online is the most cost effective way to go as retail stores inflate prices by as much as 300%. A good source for our European customers can be found here.


  • teenagesounds

    FIRST!!

  • http://www.eangolden.com Ean Golden

    2nd!

  • last.comes.first

    Hey, thanks for a great article! Now you got me even more convinced that I should buy a midi-fighter. Also, where can you get the touch strips?

    thanks

  • space monkey

    Bronze!

    Cool idea and great theme

  • http://www.mediumheavy.com kelsey7k

    dope!

  • Doc Country

    nice…

  • jasonmd2020

    Just ordered a Midi Fighter kit today. (Had to wait for Paypal to release funding. Bought the buttons a week ago & they just arrived today!) As this is the first piece of gear I’m slapping together myself I got a question on modding. I was wondering if you could wire in 1/4″ jacks instead of knobs or buttons, allowing expression pedals or footswitches to be plugged in. Why should fingers get all the fun? :)

  • Racheeed

    Awesome !!!
    Now can you play anything else than salsa on this thing ? ;-)

  • DJ Phaidon

    @jasonmd2020 Yes, you should be able to use 1/4″ jacks which could be then plugged to pedals.

  • JeengleBeanz

    Radzilla Quesadilla

  • Dj Buca

    Smoke’em, Build’em, Play’em, Nice, very nice!

  • http://www.djlantau.com Lantau

    This looks absolutely rad! I’d been holding out for a MidiFighter SE but seeing a custom enclosure as cool as this I’m half-tempted to go that route instead…

    Props to an excellent enclosure though!

  • DiGiTaLFX

    Oooooo I’ve been planning a custom controller for a while now but got stuck on the enclosure. This has open up lots of new ideas!

  • http://www.soundcloud.com/b_matty/ B-Matty

    wow…that’s epic :D put everything into perspective a bit for me too :D

  • Fruw

    you added only the 4 knobs??
    are the blue and white buttons, the buttons that are normaly with the diy fighter(different color)??

    is it possible to add 4 knobs and 4 buttons or only one of these??

    can you tell me where to get some faders??

    thank you and sorry for my english…

  • Yul

    ***** 5 stars!

  • minimal

    great idea! now onto my sardine can FX controller project!

  • http://www.tonsystem-klangkunst.de/blog/199/links-der-woche-01-02-07-02-2010/ Links der Woche 01.02. – 07.02.2010

    [...] DIY Mod: Cuban Midi Crisis [...]

  • Vinicius Hoffmann

    Great DIY Project
    congrats!

    I’m just wondering, I want to make a big controller for 4 decks (eq, transport, loop, 4/8 cuepoint juggling etc) + 2 fully customized FXs, 2 banks of supper FXs routines

    As I’m thinking in a big project I was wondering what would be the best plataform to work the thing on?
    Arduino?
    MIDIBOX?
    Midifighter?

    Ean,
    Can we please have a nice full comparision of all plataforms of DIY MIDI Projects and the best online store to buy parts (with worldwide shipping if possible)?

  • jasonmd2020

    [quote comment="26974"]Great DIY Project
    congrats!

    I’m just wondering, I want to make a big controller for 4 decks

    [/quote]

    Four Midi Fighters in the same housing? Install a powered USB hub in the box with them so you only have to plug in one cable…

  • Fatlimey

    See? Told you it was easy. :-)

    Using the Midifighter as a general platform – it’s perfectly possible to add more than 4 buttons and 4 analog controls if you are prepared to use extra chips (parallel-to-serial chips and analog multiplexors) and are ready to add code to the firmware.

    The 4-buttons and 4-sliders are just the controls built in as standard. Feel free to go further, there’s plenty of program memory and horsepower left in the CPU.

  • Double DutchDj

    Sweet! Who’s going to be the first to stick a midi fighter in a lazy boy arm chair.

  • Wil

    respect!

  • Anonymous

    Dope mod!

  • Star5

    [quote comment="26974"]
    As I’m thinking in a big project I was wondering what would be the best plataform to work the thing on?
    Arduino?
    MIDIBOX?
    Midifighter?
    [/quote]
    Don`t forget the HALE UMC32 platform from Hale Microsystems.
    Moldover has created his new Mojo using this controller.

  • Sarasin

    Sickness……. I saw the cigar box and immediately went DOH! Such an obvious, easy solution to a housing. I too now want my self made Midi Fighter thing….doo daa. And there is an added bonus…. The wife cant bitch….cuz i am making it myself….kinda. So this New Bloody Box Thing That Costs So Much Fucking Money…..is not. Haha.

  • http://findingflavors.com magicyoyo

    Ean, your writing continues to amaze me. Props on all of your hard work and for inspiring great conversation in the controllerism / DJ community. Side note: I enjoy the creative photography that is on your site. Who takes the photos?

  • ldc1129

    Slick……

  • Anonymous

    Dude. You were totally stoned, weren’t you? :)

  • Anonymous

    Dude, that’s a dominican box, not cuban. don’t give props to cuba and then use a DR box. that’s insulting. castro would lop your hands off. no more scratching EVER.

  • the caper

    Dude, that’s a dominican box, not cuban. don’t give props to cuba and then use a DR box. that’s insulting. castro would lop your hands off. no more scratching EVER.

    SOOOO GOOD

  • http://DJTT deraadt

    @magicyoyo I wrote the article/pictures and will be contributing more. We have a good team!

    @Vincius watch this space for a roundup in due course!

    @the caper…i kno its not cuban…humbled

    There may a CMC 2.0 from all the great feedback and awesome work on the forums. Thanks guys.

  • B33SON

    That title is pure genius. Love the article too. Very inspiring. :)

  • http://www.elijahbtorn.com ebt

    SHIT YEAH!

    that is fucking great! my friend was suggesting I make my enclosure out of a cigar box or lunchbox. i opted not to and I’m glad cause you have a personal connection AND you did a badass job!

  • groveroto

    In the blueprint there is a dominican republic note, It should be a cuban peso or chavito LOL if this is a cuban mod… for the other thing it looks nice.
    Will midifighter work with serato itch and vci 300???

  • groveroto
  • GC

    I just have to say this Salsa music did not come from Cuba. Salsa was created in NY. Salsa is a mix of Afro-Caribbean sounds, it does not come from one source in particular.

  • http://www.djmannymunet@myspace.com mannymunet

    salsa was created in puerto rico not new york or cuba the puerto rican immigrants that move to ny in the 50s implement the sound that was already forge in puerto rico from bands like cortijo y su combo,rolando la serie etc read salsa history first before talk.

  • groveroto

    Hahahaha always the same argument… Mambo did not exist before salsa??? Where did it came from??? and who was the first mambo singer??? Boriquas gave it name but it existed in cuba several years before

  • groveroto

    The mambo was not created in the palladium as many ignorants think

  • Txusic!!

    HA!!! AWESOME but the cigars arent cuban u dimwit.. hehehe
    Theyre Dominican Rep!!!
    Man… u ppl rock, awesome stuff, thanks for all of the help; the hints and inspiration and also big up to those amazing sets!!!!

  • http://www.djtechtools.com/2010/03/08/diy-midi-controllers/ DJ TechTools

    [...] (buttons, rotary) direct wire connections. For more on types of inputs and components see the Cuban MIDI Crisis [...]

  • http://djtechtools.com/forum/showthread.php?t=21364 fbonito

    hello,

    i don’t know iff this is the right place to ask this questions… but i will give it a try…

    you talked about “rotary encoders” in the begining, i’m working on my DIY gamepad/midi controller, and would like to incorporate one of this rotary on it…

    i’ve found a lot of information about rotary for arduino, midi, etc, but not for gamepads, as far as i undersand, could i wire one of this rotarys in two contacts (for excample connections 1 and 2) of the gamepad, so that iff i turn right it will press repeat 1 and turn left press repeat 2?

    is it how this works?

    thanks
    fbonito

First Time?

This site is dedicated to digital djs. We develop performance tools and teach cutting edge techniques that enable creative expression. Visit tutorial videos on youtube, equipment reviews in the blog and a very helpful community in the forum. New articles every Mon, Wed, Fri.
Subscribe with one million others

Featured Article

DJ TechTools Traktor Kontrol S4 Mapping

The long awaited Traktor S4 Mapping is here and totally FREE. Continue reading for a full video and the download link.

Categories:

RSS DJ TechTools Forums

  • laptop for TSP2...will it be enough??
    hi there... im buying this laptop http://www.notebookcheck.net/Review-Lenovo-ThinkPad-Edge-E320-i3-2310M-Subnotebook.60200.0.html only... […]
  • $120 / E100 voucher from NI for S2 owners
    have received an email form NI offering a voucher for their store due to buying the S2 just before the new price. anyone else got this? "Today we... […]
  • DNS 3700 and time code
    Last night was the first night I have ever djed using these decks and cd timecode and I can honestly say that is was the most disappointing... […]
  • Rain / Filter Tip - (drip-hop)
    Here are a couple of tracks I have been working with on and off for about two years. Recently acquired my own pair of studio monitors, so finally got... […]
  • Blogging for DJ MAG CANADA!
    Hey guys. I've got a semi weekly bit blogging for DJ MAG CANADA! The blog is gonna be on Mondays and Thursdays! If you know any Canadian DJs or... […]