Arcade Buttons for Days

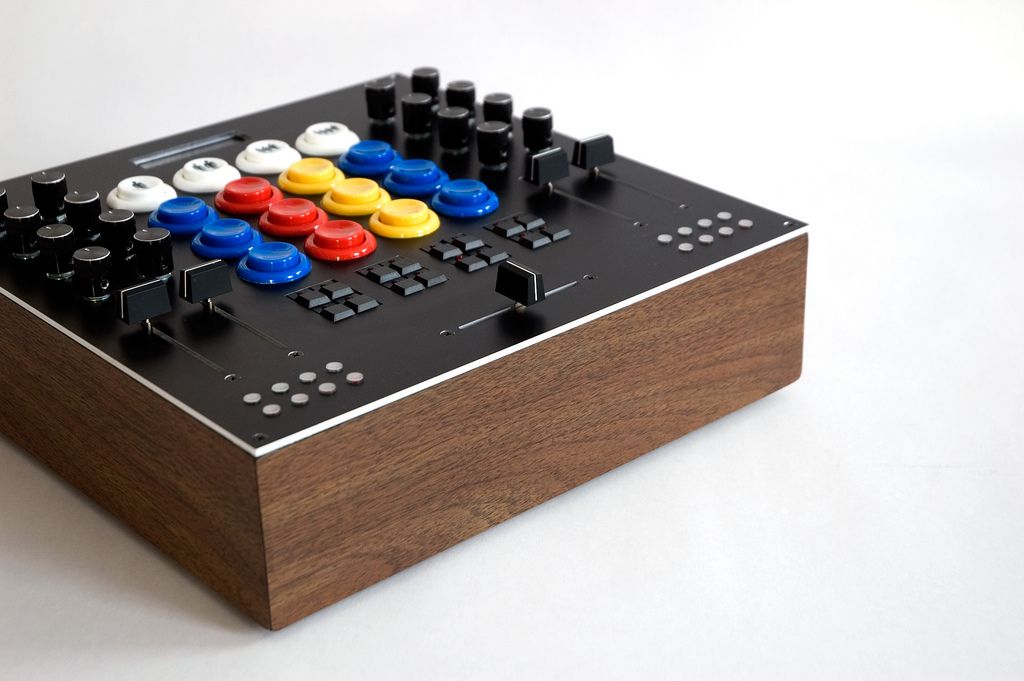
In the search for a perfect tactile button you need not look further than your local arcade. More than over 20 years of R&D by millions of teenage boys has proven arcade buttons to be reliable, fun and rapid fire fast. So its not surprising that the concept has started to take off after I posted my arcade button tutorial many months back. One of our readers duplicated the mod flawlessly and even added a few faders. MidiFidler is making a small run of arcade button midi controllers for the Dj TT community. Now I noticed this brilliant mixer based on the DIY MIDIBox64 kit that takes all of them to the next level.

The creator of this lovely piece of gear, William, was kind enough to list the source for all his parts:

-The faders are 60mm Bourns PTS series mouser.com/search/ProductDetail.aspx?qs=b8viK DOLiXaWB8SJ8…

-The Arcade buttons are from Happ Controls (bought on ebay)

- The middle led buttons are Shanpu surplus from All Electronics (out of stock, I think)

- The bottom led buttons are MEC 3F (surplus from Electronics Goldmine w/o keycaps). The caps had to be imported through Newark Electronics.

-The pots and knobs are from Futurelec (Alpha pots, no name black aluminum knobs)

-The screen is from Sparkfun

-The case is a 12″x12″ Hammond from Mouser, covered in faux walnut iron on melamine called Band It (from Parts Express)

-The circuit boards are from SmashTV www.avishowtech.com/mbhp/

Not ready to jump into the deep end of the midi pool yet? I am working on designing a simple DIY kit that you can easily build at home without too much fuss. Stay tuned for more info on that.

22 Responses to “Arcade Buttons for Days”


  1. 1 averagejoe

    god damn!!!!

  2. 2 Teebee

    god damn!!!!

    oh yes, as you said!!!

  3. 3 VoOFA

    what a beauty, awsome work!

  4. 4 Teebee

    to be honest, this thing is the freakin shit! will u trade my uc33e for one of those babies? XD …i guess not.. how much did this whole thing cost?

  5. 5 BentoSan

    Nice work indeed !
    Keep up the good work :
    Huge thumbs up for sharing the goodness cant wait for more info on your kit :)

  6. 6 Argus

    looks awesome. are the “people” buttons backlit? what are they for? I would probably use them for focus together with another MIDI controller.

  7. 7 William

    Thanks for the post/compliments! This is my project. If anyone has any questions let me know.

    I’ve gotten a lot of amazing response from people wanting to buy them and I’m looking into making a small run. Because it involves the MIDIBox platform, legally it has to be noncommercial, but I’m seeing what it would take to make an openly hackable Arduino based design.

    looks awesome. are the “people” buttons backlit? what are they for? I would probably use them for focus together with another MIDI controller.

    Thanks. The “people” buttons are just standard run of the mill arcade player buttons. They’re just to signify the channels, and for triggering in Live or to start/stop decks in Traktor…

  8. 8 Fatlimey

    Thanks for the post/compliments! This is my project. If anyone has any questions let me know.

    I am loving your work, and thank you very much for the details on what parts you used on the front panel. Hard info like this is difficult to come by so thanks a lot.

    Swapping basic MidiBox for Arduino should be straightforward, especially if you used individual multiplexer boards from the MidiBox catalog. The software for your device should end up being a simple “poll and push” loop, with a side bit for updating the display state from a serial pin. I’ve got heaps of MIDI-for-Arduino information filed away if you need some more Arduino background. fatlimey at the-mail-that-is-”G”.

  9. 9 William
    Thanks for the post/compliments! This is my project. If anyone has any questions let me know.

    I am loving your work, and thank you very much for the details on what parts you used on the front panel. Hard info like this is difficult to come by so thanks a lot.

    Swapping basic MidiBox for Arduino should be straightforward, especially if you used individual multiplexer boards from the MidiBox catalog. The software for your device should end up being a simple “poll and push” loop, with a side bit for updating the display state from a serial pin. I’ve got heaps of MIDI-for-Arduino information filed away if you need some more Arduino background. fatlimey at the-mail-that-is-”G”.

    Awesome, thanks for the info. I’ll definitely hit you up if I think of any questions.

    to be honest, this thing is the freakin shit! will u trade my uc33e for one of those babies? XD …i guess not.. how much did this whole thing cost?

    Thanks, but I think I’ll keep it :) . Overall it cost me about $400, but it would of been about $300ish if I didn’t make some ordering mistakes.

  10. 10 Jonny Pez

    This is great. Creating a DIY controller for Ableton Live (and maybe additional software) is exactly the kind of summer project I’m looking for. I think the hardest part is deciding exactly what you want your controller to be, and by that I mean knowing how you will use your controller in a setup.

    I would be very interested to know how William is using this controller with Live and how other people here would use this controller, or a custom controller of their own.

    If the sky is the limit, what would you create and how would you use it?

  11. 11 david

    hey i was wondering if there was a tutorial on how to actually wire ustom buttons and parts to get a custom midi solution going. thank you :)

    great job william btw. you’ve really inspired me to do my own creation. i just want to know due to my lack of knowledge in electronics and the parts and all that. but i kknwo with some effort i can do it :)

  12. 12 William

    hey i was wondering if there was a tutorial on how to actually wire ustom buttons and parts to get a custom midi solution going. thank you :)

    I’m not sure if there are any all encompassing tutorials, but the easiest way to get your feet wet is to buy a pre-configured/assembled “logic” board and add parts to fit. Doepfer makes some simple/nice ones like the USB64, http://www.doepfer.de/home_e.htm . Also look out for the Livid MIDIDIY http://www.lividinstruments.com/hardware_midiy.php , and of course the kit Ean mentioned.

    After that it’s just a matter of learning to solder well (not that hard), learning how buttons/pots work, and throwing it into a pretty box. You miss out on having it completely customizable, but it’s still well worth it and better than 90% of the crap on the budget controller market.

    Hope that helps a little…

  13. 13 DJ ToS

    I’d stick to midibox and build/program it from scratch.
    If you are building yourself a controller then it is quite usefull to know how it works(and what is wrong with it when it does not boot).

  14. 14 david

    I’m not sure if there are any all encompassing tutorials, but the easiest way to get your feet wet is to buy a pre-configured/assembled “logic” board and add parts to fit. Doepfer makes some simple/nice ones like the USB64, http://www.doepfer.de/home_e.htm . Also look out for the Livid MIDIDIY http://www.lividinstruments.com/hardware_midiy.php , and of course the kit Ean mentioned.

    After that it’s just a matter of learning to solder well (not that hard), learning how buttons/pots work, and throwing it into a pretty box. You miss out on having it completely customizable, but it’s still well worth it and better than 90% of the crap on the budget controller market.

    Hope that helps a little…

    I’d stick to midibox and build/program it from scratch.
    If you are building yourself a controller then it is quite usefull to know how it works(and what is wrong with it when it does not boot).

    thanks! ill look into that.

    i think ima have to sit down and learn all this stuff too haha

    @DJ ToS
    thanks for the advice man :)

  15. 15 DJ ToS

    You won’t be praising me when you end up with a half booted midibox core board. (the best thing with electronics problems is that you learn much from it).
    The downside of midibox and mididiy is their midi port communication(they don’t have native usb connectivity and are forcing you to buy usb2midi cable).
    Arduino on the other hand has USB but it probably is not that musch optimised.(i.e. midibox scans last two changed contols more agresivly thus lowering response time).

    …requires just only 75 uS to fetch the data from 128 digital input pins(buttons) and to write out data to 128 digital output pins(LEDs). 16 rotary encoders are handled within 100 uS. Analog inputs(pots & faders) are scanned in background, every 200 uS a conversion result is available….

  16. 16 Fatlimey

    (i.e. midibox scans last two changed contols more agresivly thus lowering response time)

    What a great idea - you only have two hands, so optimise the driver using that fact. I’m writing that one down…

  17. 17 Jonny Pez

    William! I so glad to see that you are here to answer questions. I’m dying to know how you use your controller in a live setup. Are the first row of arcade buttons used to change the midi notes of the rest, like a bank change? Do the color arcade buttons trigger clips or do you use them in an instrument like Drum Machine. How do you use the led buttons and what about the led lights in the bottom corners?

    Are you primarily playing tracks like a DJ, or orginal sample based music, or something in between?

    Very curious. Thanks.

  18. 18 N2

    very nice. wish i had enough electronics knowledge to pull one off.

  19. 19 Pascalinou

    Amazing!

    I need to learn how to do this!

  20. 20 William

    Thanks again.

    William! I so glad to see that you are here to answer questions. I’m dying to know how you use your controller in a live setup. Are the first row of arcade buttons used to change the midi notes of the rest, like a bank change? Do the color arcade buttons trigger clips or do you use them in an instrument like Drum Machine. How do you use the led buttons and what about the led lights in the bottom corners?

    Are you primarily playing tracks like a DJ, or orginal sample based music, or something in between?

    Very curious. Thanks.

    I plan on using it for the following:

    -Chopped up DJ sets in Live (arcade buttons triggering clips, middle buttons for xfade assignment and fx sends, bottom buttons for a custom looper patch to be made in Max, knobs eq/fx, faders vol/xfade). Basically ripping all the good bits out of others tracks, incorporating a ton of my own edits, samples, loops, and throwing them together at a mile a minute.

    -Eventually an original live set structured like above.

    -Basic DJ sets in Traktor (haven’t mapped it out yet, but nothing really fancy… i.e. faders for vol/pitch, arcade buttons for transport/cue points, etc). Standard 2 track mixing.

    -A general purpose “studio” controller (automation, etc).

    -Sequencer patches I’m building in Max (16 step acid sequencer, and a basic x0x style drum sequencer.

    Musically, I’m into everything from harsh noise, to Raster-Noton style minimalism, to classic acid/rave/techno/hip hop, to silly experimentalism, to the amazing electro/bassline/fidget/bmore/whatever craze that’s sweeping across the world. Basically anything that is hard/synthetic/silly/cut up/experimental/gimmicky/makes you want to move/not boring.

    I designed the controller with all this in mind and kept it tactile, clean, symmetrical, and open ended. Hope that answers you questions

  21. 21 abdul

    mate, do you think you will build a run of these? this is pretty much my ideal controller too. I use Xsession pro but i need like 50 more buttons plus a few more pots.

  22. 22 William

    mate, do you think you will build a run of these? this is pretty much my ideal controller too. I use Xsession pro but i need like 50 more buttons plus a few more pots.

    I’m considering it, but want to do some research. I’ll keep everyone posted if there are any major developments.

    Thanks

Leave a Reply

Quote selected text